Learning JQuery
Intro
In an effort to expand my knowledge of php and javascript, I created this page to toy around with jQuery. With data stored in a SQL table, I use the jquery and a jqGrid library to display this fantastic dynamic table. Adding a few extra features like hoverboxes over the comments cells adds a bit of accessability to the extended content stored in them. Feel free to leave a comment and please remember that this is a work in progress!
Example
How Was It Done
To begin working on this tutorial, you will need the following few items
- JQuery - http://jquery.com/
- JQueryUI - http://jqueryui.com/
- JQGrid - http://www.trirand.net/
- An SQL Database
Install jquery by following the link from the first tab to http://jquery.com. Once you reach the page, on the right hand side you will notice a download button. Make sure that the download is set for the 'Production' release, download the file, and host it somewhere on your server.

The next step is to grab a JQueryUI library so we can see widgets like tabs, accordions, sliders, buttons, etc. Follow http://jqueryui.com/ and grab it's download package as well.

Once the package is downloaded, there are a few files that we want to move out to the server, the first being the "jquery-ui-1.8.16.custom.min.js" file that is in the [zipfile]\js folder. The second set of files we want to move out is the folders contained in the [zipfile]\css folder. Now that we have installed the necessary JQuery files, the next step is to install the JQGrid onto the webserver. Follow http://www.trirand.com/blog/?page_id=6 to it's download page and click the download button ensuring that all of the checkboxes above the button are enabled

Once downloaded, we want to move out the contents of the "[zipfile]\js" folder out to the webserver. Make sure that you also include the "[zipfile]\js\i18n" folder as well, as it contains the locale files for your region.
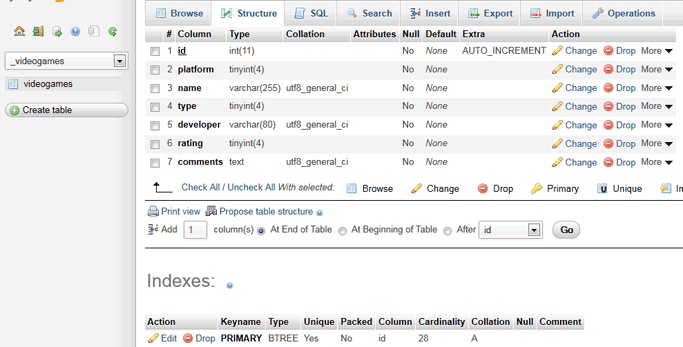
If you have had any experience with SQL tables, this part of the job is fairly easy. Because I knew I was going to create an example with videogames as the main topic, the first thing I created was a SQL table called _videogames. The table has an index through the id number, which is an auto-increment integer.

When creating your table, take into account the size of the attributes that you are adding to your structure. I plan on using a rating system of 0-10, a platform that will be keyed off of an integer 0 or 1, and a game type keyed off of a small integer as well. To make the table far more efficient, it is a good idea to use TINYINT for these few integer keys. VARCHAR for short variable text can be used for things like the name and developer, while a TEXT can be used for the comment as we dont really know exactly how long that field will be. Once you are done creating the structure, make sure to run an OPTIMIZE on the table.

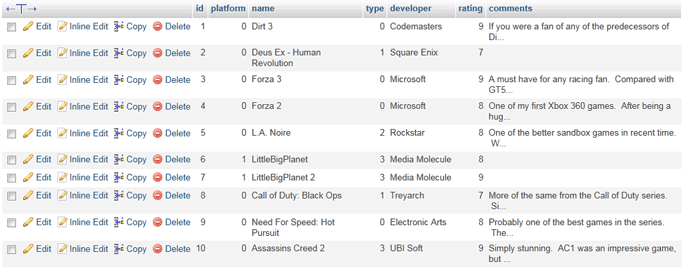
Next, we can start filling in some data into the structure to get a baseline to create our table from. Assuming that you are using a table similar to mine, you can simply insert objects into the table via the following command
INSERT INTO `_videogames`.`videogames`
(`id`, `platform`, `name`, `type`, `developer`, `rating`, `comments`)
VALUES (NULL, '0', 'Dirt 3', '0', 'Codemasters', '9', 'This Game Rocks!');
Remember, our id is an auto-incrementing index, so pass in a "NULL" to make the table decide what the next available id number is
Now that we have set up our table, and imported all of our libraries to our webserver, we need to start our page by actually including the libraries into the document we are working on. To do this, add the following lines in between the <head> tags of your page.
<link rel="stylesheet" type="text/css" media="screen"
      href="/libraries/jqGrid-4.1.2/css/redmond/jquery-ui-1.8.16.custom.css" />
<link rel="stylesheet" type="text/css" media="screen"
      href="/libraries/jqGrid-4.1.2/css/ui.jqgrid.css" />

<script src="/path-to.../jquery-1.6.2.min.js" type="text/javascript"></script>
<script src="/path-to.../jquery-ui-1.8.16.custom.min.js" type="text/javascript"></script>

<script src="/path-to.../grid.locale-en.js" type="text/javascript"></script>
<script src="/path-to.../jquery.jqGrid.min.js" type="text/javascript"></script>
Once you have confirmed that you are properly importing your scripts and stylesheets, we can now implement the code for the jqgrid. We will be using a mix of javascript and php to handle a few parts of this grid, especially the authentication for special tasks like adding, deleting, and editing.
jQuery(document).ready(function(){
	jQuery("#list2").jqGrid({
		url:'sqlhandle.php?q=2',
		datatype: "json",
		colNames:['Platform','Name', 'Type', 'Developer','Rating','Comments'],
		colModel:[
			{name:'Platform',index:'platform', width:60, sorttype:"int", editable:true},
			{name:'Name',index:'name', width:175, editable:true},
			{name:'Type',index:'type', width:65, align:"right",sorttype:"int",editable:true},
			{name:'Developer',index:'developer', width:110, editable:true},
			{name:'Rating',index:'rating', width:43,align:"right",sorttype:"int", editable:true},
			{name:'Comments',index:'comments', width:250, sortable:false,editable:true}
		],
		rowNum:5,
		rowList:[5,10,15],
		pager: '#pager2',
		sortname: 'name',
		viewrecords: true,
		sortorder: "asc",
		caption:"Currently Owned / Played Games",
		width: '100%',
		height: '100%',
		shrinkToFit: 'false',
		loadComplete: function(data){
		},
		onSelectRow: function(rowid, status){
		},
	});
<?php
$user =& JFactory::getUser();
if($user->id) {
?>
	jQuery("#list2").jqGrid('navGrid','#pager2',
		{}, //options
		{height:280,reloadAfterSubmit:false,url:"sqladd.php"}, // edit options
		{height:280,reloadAfterSubmit:false,url:"sqladd.php"}, // add options
		{reloadAfterSubmit:false,url:"sqladd.php"}, // del options
		{}
	);
<?php
} else {
?>
	jQuery("#list2").jqGrid('navGrid','#pager2',
		{edit:false,
		 add:false,
		 del:false}
	);
<?php
}
?>
});
The only other thing that needs to be added to your site is the following html code which will stand as placeholders for when the table is rendered.
Lets break up the code to take a look at what is going on piece by piece so that we can do a good job of understanding what is going on. The entire piece of code is wrapped in a standard JQuery function call
jQuery(document).ready(function(){
	...
});
The above serves two purposes: first, it initializes and ensures that the jquery libraries are ready for use. The second part of the code, the "function()" call, waits for the page to finish loading before any jquery calls are made. This is pretty standard when using JQuery.
Next is the core of the JQGrid code. This piece of code tells the browser to parse the div "list2" as a JQGrid. The first parameter, url, is the server side code that is executed to read the data from the SQL table. The "colnames" parameter signifies the title of each column, while "colmodel" formats each column's size, data index, data type, and if they are allowed to be edited. You can change the number of rows displayed at a time, and display the pagination via the "rownum" and "rowlist" calls respectively. We can easily set the default sort by changing the "sortname" parameter, and set its sort order through the "sortorder" parameter. The JQGrid also allows the use of a few standard functions that can be found through their website. I have gone ahead and shown two of their most commonly used ones, loadComplete, and onSelectRow.
jQuery("#list2").jqGrid({
	url:'sqlhandle.php?q=2',
	datatype: "json",
	colNames:['Platform','Name', 'Type', 'Developer','Rating','Comments'],
	colModel:[
		{name:'Platform',index:'platform', width:60, sorttype:"int", editable:true},
		{name:'Name',index:'name', width:175, editable:true},
		{name:'Type',index:'type', width:65, align:"right",sorttype:"int",editable:true},
		{name:'Developer',index:'developer', width:110, editable:true},
		{name:'Rating',index:'rating', width:43,align:"right",sorttype:"int", editable:true},
		{name:'Comments',index:'comments', width:250, sortable:false,editable:true}
	],
	rowNum:5,
	rowList:[5,10,15],
	pager: '#pager2',
	sortname: 'name',
	viewrecords: true,
	sortorder: "asc",
	caption:"Currently Owned / Played Games",
	width: '100%',
	height: '100%',
	shrinkToFit: 'false',
	loadComplete: function(data){
	},
	onSelectRow: function(rowid, status){
	},
});
This last part is very important as it will control who can manipulate the data on the table. Take note that this section will be different depending on what platform you are using. In my case, I am using the Joomla platform to design my website, so I will be making use of their JFactory class. In doing so I perform a couple of php 'if' checks. In the case below, if the user is logged in, we make the "pager2" visible with the edit, add, and del options. The url in this case is a separate url than the one mentioned previously, as this url will take care of the data manipulation of the table. In retrospect, if the user is not logged in, we just show them the default options in "pager2" while hiding the edit, add, and delete functions, only making search available.
<?php
$user =& JFactory::getUser();
if($user->id) {
?>
	jQuery("#list2").jqGrid('navGrid','#pager2',
		{}, //options
		{height:280,reloadAfterSubmit:false,url:"sqladd.php"}, // edit options
		{height:280,reloadAfterSubmit:false,url:"sqladd.php"}, // add options
		{reloadAfterSubmit:false,url:"sqladd.php"}, // del options
		{}
	);
<?php
} else {
?>
	jQuery("#list2").jqGrid('navGrid','#pager2',
		{edit:false,
		 add:false,
		 del:false}
	);
<?php
}
There are two parts of server-side code that need to be considered, the first that handles obtaining the data for the table, and the second, that handles the data manipulation for those who are properly authenticated
<?php
$page = $_GET['page']; // get the requested page
$limit = $_GET['rows']; // get how many rows we want to have into the grid
$sidx = $_GET['sidx']; // get index row - i.e. user click to sort
$sord = $_GET['sord']; // get the direction
if(!$sidx) $sidx =1;

// Connecting, selecting database
$link = mysql_connect('localhost', 'SQL_DB_NAME', 'SQL_DB_PASSWORD')
or die('Could not connect: ' . mysql_error());
mysql_select_db('SQL_DB_TABLE') or die('Could not select database');

$result = mysql_query("SELECT COUNT(*) AS count FROM SQL_DB_TABLE");
$row = mysql_fetch_array($result,MYSQL_ASSOC);
$count = $row['count'];

if( $count >0 ) {
	$total_pages = ceil($count/$limit);
} else {
	$total_pages = 0;
}
if ($page > $total_pages) $page=$total_pages;
$start = $limit*$page - $limit;
$SQL = "SELECT id,platform,name,type,developer,rating,comments "
     . "FROM SQL_DB_TABLE ORDER BY $sidx $sord LIMIT $start , $limit";
$result = mysql_query( $SQL ) or die("Couldn t execute query.".mysql_error());

$responce->page = $page;
$responce->total = $total_pages;
$responce->records = $count;
$i=0;
while($row = mysql_fetch_array($result,MYSQL_ASSOC)) {
    $responce->rows[$i]['id']=$row[id];
    $responce->rows[$i]['cell']=
	      array($row[platform],$row[name],$row[type],$row[developer],$row[rating],$row[comments]);
    $i++;
}
echo json_encode($responce);
?>
The above code is a very simple server script that is run. All we are doing is obtaining the requested page, the number of rows to have in the grid, the index we are sorting by, and the sort direction. We then log into the database, and run a query to see the total number of items in the table, this helps us get the total number of pages we will have. Next, using that information, we do a SQL query for the columns that we want from the table, we order it and sort it by the supplied parameters, and we limit the results to the indexes that are calculated from the page we are requesting. We then parse the output into a JSON response, and send it back to the client.
<?php

$id = $_POST['id'];
$comments = $_POST['Comments'];
$developer = $_POST['Developer'];
$name = $_POST['Name'];
$platform = $_POST['Platform'];
$rating = $_POST['Rating'];
$type = $_POST['Type'];

$sql = "";

if($_POST['oper']=='add')
{
  $sql = "INSERT INTO `SQL_DB_NAME`.`SQL_DB_TABLE` "
       . "(`id`, `platform`, `name`, `type`, `developer`, `rating`, `comments`)"
       . " VALUES (NULL,'"
       . $platform . "','"
       . $name . "','"
       . $type . "','"
       . $developer . "','"
       . $rating . "','"
       . $comments . "');";

} else if($_POST['oper']=='edit') {
  $sql = "UPDATE `SQL_DB_NAME`.`SQL_DB_TABLE` SET `platform`='" . $platform
       . "',`name`='" . $name . "',`type`='" . $type
	   . "',`developer`='" . $developer . "',`rating`='"
	   . $rating . "',`comments`='" . $comments
	   . "' WHERE `SQL_DB_TABLE`.`id` = " . $id;

} else if($_POST['oper']=='del') {
  $sql = "DELETE FROM `SQL_DB_NAME`.`SQL_DB_TABLE` "
       . "WHERE `SQL_DB_TABLE`.`id` = " . $id;

}

// Connecting, selecting database
$link = mysql_connect('localhost', 'SQL_DB_NAME', 'SQL_DB_PASSWORD')
or die('Could not connect: ' . mysql_error());
mysql_select_db('SQL_DB_TABLE') or die('Could not select database');

if($sql != "" && mysql_query($sql)){
	echo "Record Handled.";
}else {
	echo "Error Handling Record: " . mysql_error();
}
mysql_close($link);

?>
Following a similar pattern that we did for our code above, we are first going to read in all of the editable parameters from our JQGrid through the $_POST method. Once we read the parameters in, we need to find out the type of operation is requested, which is in the $_POST parameter called 'oper'. Depending on the three operations, 'add', 'edit', and 'del' we can configure our SQL statements to either add an item, edit, or delete an item respectively.
 Mobile Menu