 Mobile Menu
2009 - 2011 RX8 Tuning
One thing that I had always been curious about when dabbling in the world of working on
cars and modifying them was the idea of tuning. I never really understood what the concept
of tuning a car entailed, and exactly what was being done to 'tune' the vehicle. After taking
a personal training session from one of the top RX8 tuners in the states, as well as reaffirming
what I learned by watching one of his streamed classes, I tested my knowledge by restoring my car
back to its OEM tune, and starting from scratch. Now that I have managed to tune my car with the
knowledge I have aquired, I wanted to share a bit about what I have learned and some tuning tidbits
that are applicable to the Series 2 RX8.
Before proceeding, it should be noted that most of these tweaks will really only benefit a car without any of its OEM emissions equipment installed. A lot of the OEM tune has been designed to provide as much power as it can without damaging the catalytic converter. At this point I advise against any aggresive tunes with the OE emissions equipment installed. Proceed with caution.
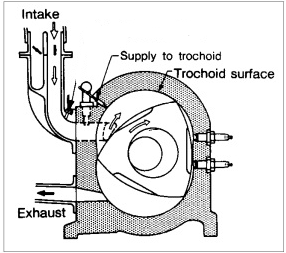
One of the first things we want to do with our tune is to take care of some precautionary settings. For those who are familiar with the rotary engine, an Oil Metering Pump is used to progressively meter engine oil into the rotor housing. This allows lubrication for the apex seals, but more importantly, helps to reduce temperatures of the apex seals, increasing their life. Because engine oil doesn't always burn cleanly, the OMP is underutilized to preserve the health of the catalytic converter.
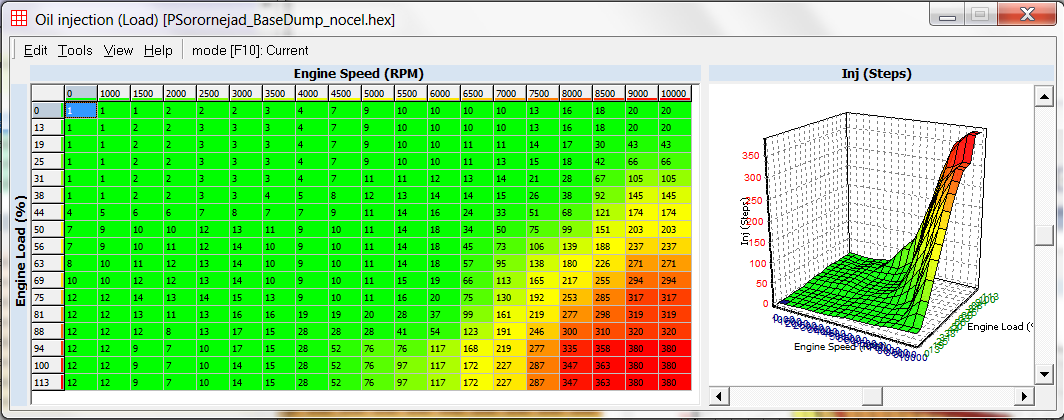
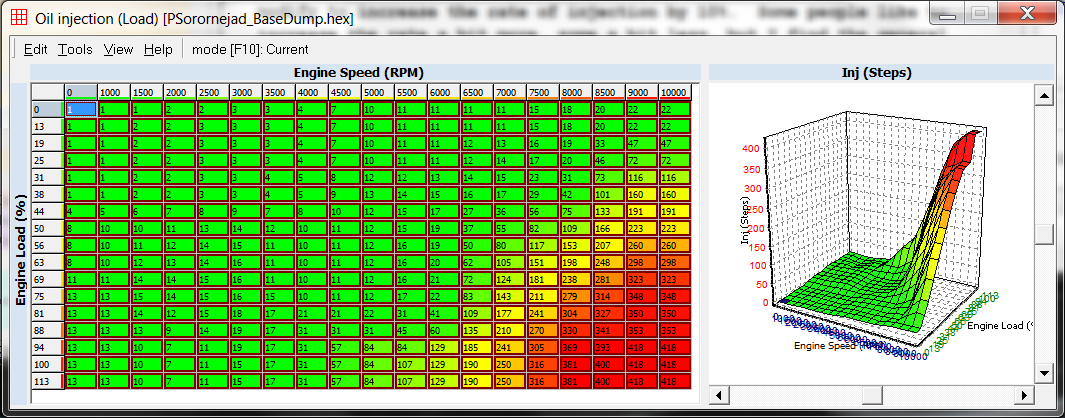
Mazdaedit provides a map called Oil Injection (Load) which we will modify to increase the rate of injection by 10%. Some people like to increase the rate a bit more, some a bit less, but I find the general consensus agree with about 10%.
Once the map is opened, you want to select every cell by either pressing `Ctrl+A`, or `Edit->Select All`. Next, increase the rate by either pressing the `*` button on your keyboard, or `Edit->Data Mul...`. In the dialog box you will want to enter `110` which corresponds to 110%, aka an increase of 10%.
The next thing we want to do is to reduce the temperature at which the fans kick on. By reducing our turn on temps by about 10 degrees (F) we can add some additional protection to the engine. At the time of this DIY, I have been working with the maker of MazdaEdit to get the temperature controls of the Series 2 working. Currently, owners of the Personal version of ME have 3 maps (Radiator Fan Temp 1 A, Radiator Fan Temp 2 Speed, Radiator Fan Temp 2). As it turns out, these maps did not have any affect on the actual fan turn-on.
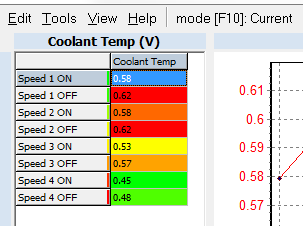
Epifan has provided me with a patch that enables a few more maps that he had found for the fan temperature. The map is called "Radiator Fan vs Coolant Temp Sensor Voltage".
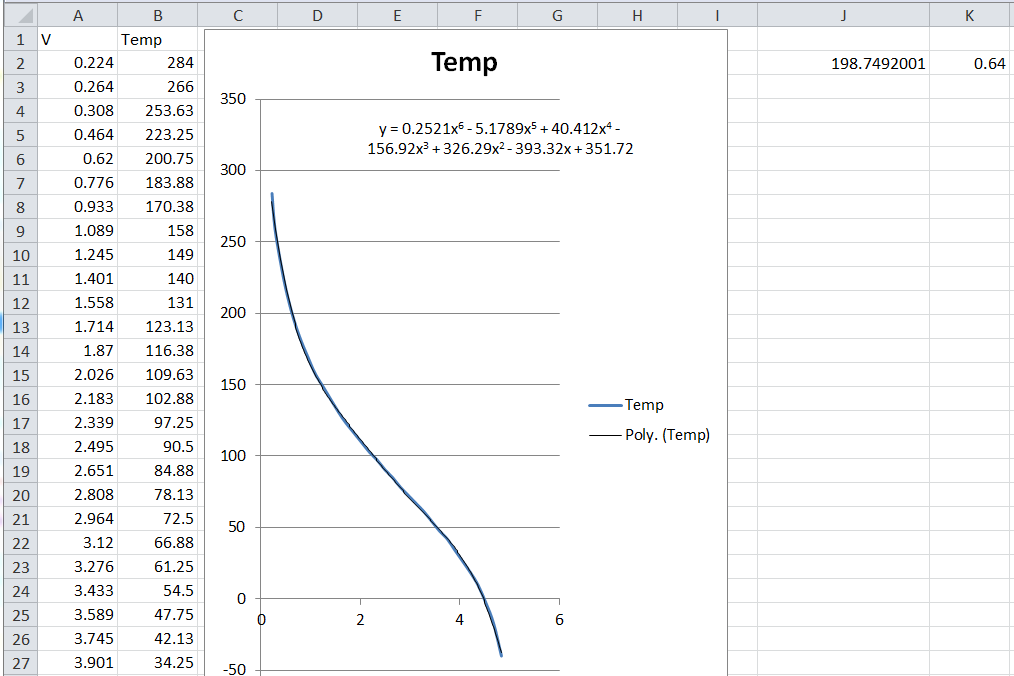
This map plots the Fan On/Off against the coolant temperature which is measured in ECT sensor voltage.
Thanks to the power of tools like Microsoft Excel, we can take our current ECT map, and plot it, and get a polynomial trendline to help us get our voltage based on the exact temperature we want.
In the image above, I have plotted the Temperature across the voltage and then used a Polynomial trendline curve. I had to increase the order to 6 so that the trendline fit the plot. Once I had a good trendline, I was able to gather the equation, which allowed me to enter any voltage and get the corresponding temperature.
With that being said, it is recommended to drop each temperature ON on the map by about 10 degrees, and set its corresponding OFF to 10 degrees lower than its ON. Within this map you will notice 4 ON/OFF rows. I have gathered the following from my tests:
Coming Soon...
Intro
Pre-Reqs
 - These guys are the guys to talk to if you need anything in regards
to tuning. Kane's incredible knowledge, personality, and passion for his trade makes the
learning experience easy and enjoyable.
- These guys are the guys to talk to if you need anything in regards
to tuning. Kane's incredible knowledge, personality, and passion for his trade makes the
learning experience easy and enjoyable. - Street Rotary by Mark Warner is an incredible book that goes into great detail about the 12A, 13B, and RENESIS rotary engines. The author goes into great detail about how a rotary engine is assembled, and how it's performance can be improved.
 - Unfortunately, the S2 RX8 doesn't have the comfort of using an Accessport to aid in tuning. Instead, a Tactrix OpenPort 2.0 must be used in conjunction with some tuning software.
 - Paired with the Tactrix, MazdaEdit has been a fantastic alternative to to the Accessport for tuning the RX8.
First Things First
OMP Rate Adjustment
FAN Speed Adjustment
Get Accurate Voltage By Plotting ECT
S1 ON - Temperature When The Fan Speed Turns on LOW
S1 OFF - Temperature When LOW turns to OFF
S2 ON - No Effect
S2 OFF - No Effect
S3 ON - Temperature When The Fan Speed Turns on Medium
S3 OFF - Temperature When The Fan Speed Turns From Medium to LOW
S4 ON - Temperature When The Fan Speed Turns on High
S4 OFF - Temperature When The Fan Speed Turns From High to Medium
CEL Masking